
Introduction to Gemini Prompts
In today’s AI-driven world, tools like Google Gemini have transformed how we create and enhance images. A “prompt” is simply the instruction you give to the AI, but the real magic lies in how you write it. Many users type basic commands and expect extraordinary results, only to feel disappointed. However, a small change in how you structure your prompt can completely transform the output. This article reveals a simple yet powerful 1-minute trick that can make even an ordinary photo look stunning and professional.
Understanding the Importance of Clarity
One of the biggest mistakes users make is being too vague. For example, writing “make this photo beautiful” gives the AI very little direction. Instead, a clear and descriptive prompt works far better. When you specify details such as lighting, mood, background, and style, Gemini understands your intention more accurately. Clarity helps the AI visualize your idea and produce a result closer to your expectations. Think of it as giving instructions to a photographer—the more specific you are, the better the outcome.
The 1-Minute Trick Explained
The secret trick is simple: use structured prompting. Instead of writing a single sentence, divide your prompt into key elements like subject, style, lighting, mood, and details. For example:
“Enhance this photo of my son, soft golden lighting, natural skin tones, cinematic background blur, high resolution, emotional and warm mood.”
This structured approach takes less than a minute but dramatically improves results. By breaking down your request, you guide the AI step-by-step, ensuring nothing important is missed.
Useful Updates
Focus on Lighting and Mood
Lighting and mood are the heart of any great photo. Even professional photographers rely heavily on these elements. When using Gemini, always include lighting details such as “soft sunlight,” “studio lighting,” or “golden hour glow.” Similarly, mention the mood you want—happy, emotional, dreamy, or dramatic. In the case of enhancing a child’s photo, warm and soft lighting combined with a joyful mood can create a magical and heartwarming effect.
Adding Style for Professional Results
Another powerful trick is adding a specific style to your prompt. Gemini can mimic different visual styles such as cinematic, portrait photography, watercolor painting, or even vintage film. For example, adding “cinematic portrait style” or “professional DSLR photography look” can instantly elevate the image. This is especially useful when you want your son’s photo to look like it was taken by a professional photographer rather than a smartphone.
Detailing the Background and Environment
Background plays a crucial role in enhancing any image. Instead of leaving it unchanged, you can guide Gemini to improve or modify it. For instance, you can say “soft blurred park background,” “sunset beach scene,” or “clean studio backdrop.” This removes distractions and highlights the main subject. In a child’s photo, a simple blurred background often works best because it keeps the focus on the child’s expression.
Useful Updates
Enhancing Facial Features Naturally
When editing a photo of your son or any person, it’s important to maintain natural beauty. Avoid over-editing by using prompts like “natural skin tones,” “subtle enhancement,” and “realistic details.” Gemini is powerful, but without guidance, it might over-sharpen or overly smooth the image. A balanced prompt ensures the result looks authentic while still being visually appealing.
Using High-Quality Keywords
Certain keywords can significantly boost the final output. Words like “4K resolution,” “ultra-detailed,” “sharp focus,” and “professional quality” signal the AI to prioritize clarity and detail. Including these terms ensures that the enhanced image looks crisp and polished. These keywords are especially useful when you plan to share the photo on social media or print it.
Experiment and Refine
Even with the best prompt, experimentation is key. Try slightly different versions of your prompt and compare the results. For example, change the lighting from “golden hour” to “soft studio light” or adjust the mood from “happy” to “emotional.” Small tweaks can produce surprisingly different outcomes. Over time, you’ll learn which combinations work best for your needs.
Common Mistakes to Avoid
Many users expect perfect results from a single vague prompt. Others overload the prompt with too many conflicting instructions. Avoid using unclear words like “nice” or “good.” Instead, focus on descriptive and meaningful terms. Also, don’t forget to keep your prompt organized—too much randomness can confuse the AI and reduce quality.
Prompt:
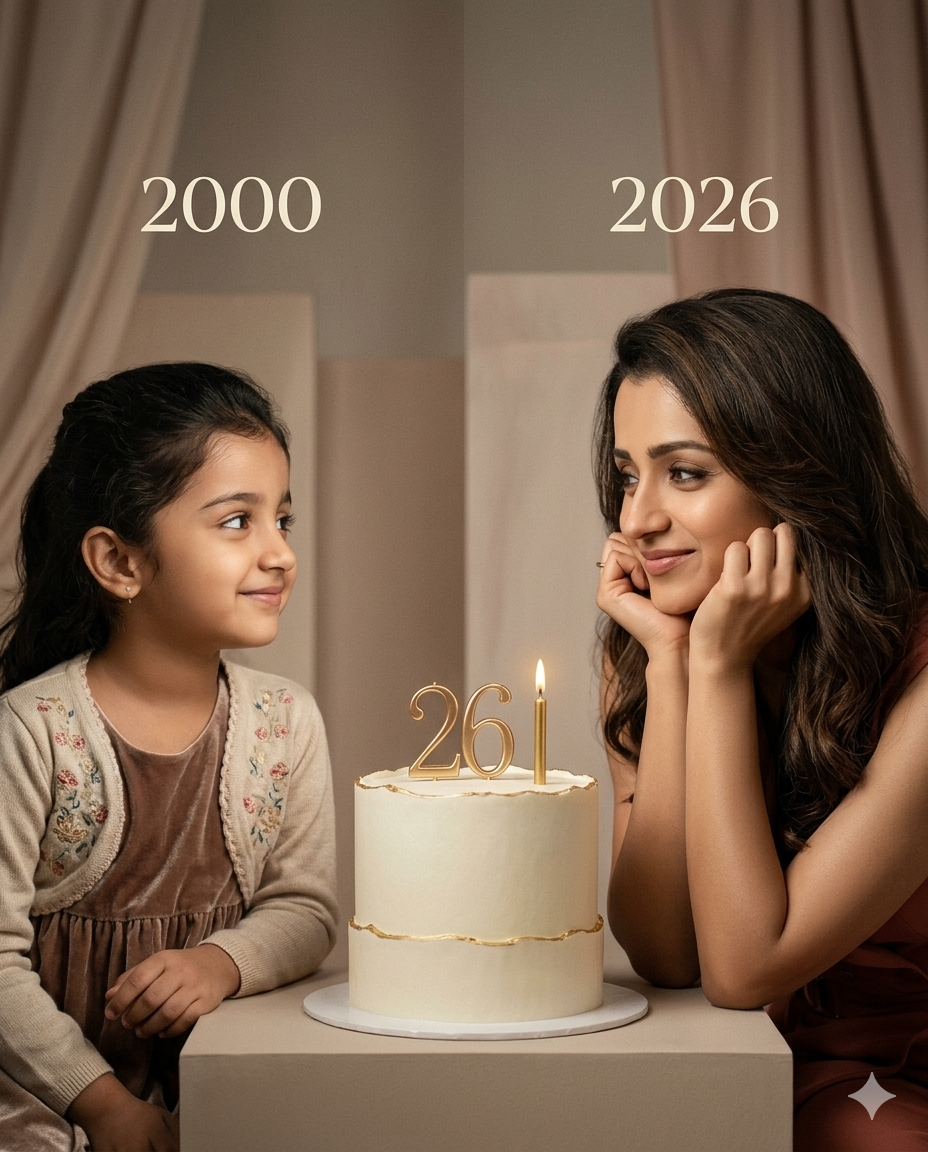
On the left: a child version of me (from a childhood photo) looking with an innocent smile to the right, with 2000 written above it.
342
On the right: A present version of me (from
a recent photo) sits with her hands under her chin and looks at the child with a calm smile, with “2026” written above her.
In the middle: a table with a simple, elegant birthday cake with number 26 on top.
Studio background: plain and soft (studio background)
The lighting: Soft, cinematic, warm (even a black-and-white photo).
Style: Professional, minimal, emotional photography, focusing on feelings and visual communication between the two versions.
Make the picture look so real like a real photoshoot.
Keep my original features without changing.
photo size 4:5
Conclusion
The secret to creating amazing photos with Gemini isn’t complicated—it’s all about how you write your prompt. By spending just one minute structuring your instructions with clear details about lighting, mood, style, and quality, you can transform an ordinary photo into something extraordinary. This simple trick can make your son’s photo look professional, emotional, and visually stunning. Once you master this technique, you’ll unlock the full creative potential of AI-powered image editing.